
What is git?
Git is a version control system that helps developers track changes to their code and collaborate with others on software projects. It allows developers to easily switch between different versions of their code and work on different features in parallel without affecting the main codebase.
Why use the command-line?
Although there are many GUI Git applications, using git from the command-line allows you to configure and streamline it to your workflow rather than being constrained by the interfaces of the GUI. It will also force you to understand more of how git works and since it's a tool that developers need to use often, I'd say it's not a bad motivation. You can still use the GUI for taking care of the more complex tasks until you get more familiar with using the command-line.
Tips to improve your workflow
1. Add aliases for commonly used commands
When using git from the command-line you are expected to write commands but this doesn't mean you can't make life easier for yourself. Instead of writing the whole command all the time, you can add shorter versions of them as aliases.
Here are some of the aliases that I use frequently:
| alias | command |
|---|---|
| g | git |
| ga | git add |
| gb | git branch |
| gc | git commit -v |
| gco | git checkout |
| gcb | git checkout -b |
| gcp | git cherry-pick |
| grb | git rebase |
| grbi | git rebase -i |
So now the following
git commit -v -m 'my commit message'
becomes
gc -m 'my commit message'
If you have zsh as your shell, have ohmyzsh installed and the git plugin enabled, there are already a lot of git aliases configured and can use them. You can have a look at them here. Even if you don't use ohmyzsh, you can take inspiration from the aliases and set them for your shell.
For the bash shell, you can add the following to your .bashrc file.
alias g='git'
alias ga='git add'
alias gb='git branch'
alias gc='git commit -v'
alias gco='git checkout'
alias gcb='git checkout -b'
alias gcp='git cherry-pick'
alias grb='git rebase'
alias grbi='git rebase -i'
2. Enable auto-correction of spelling mistakes for commands
We are human after all and sometimes we make spelling mistakes. Instead of having to correct the command ourself, we can let git do it for us if the mistakes are minimal.
We can enable git auto-correct for all git repos by using the following command:
git config --global help.autoCorrect 5
The value of help.autoCorrect is the number of deciseconds git waits before it auto-corrects and applies the command. In the command above, it will wait 0.5 seconds.
The --global flag specifies that auto-correction will be enabled for all git repositories in the system. If you omit this, it will only take effect in the current repo.

3. Improved git checkout with fzf
When you are working on a project you will need to switch between different branches. You can use git checkout <branch_name> or git switch <branch_name> to do that. But the <branch_name> needs to be exact and if you don't remember it you will need to run further commands or look up the branch name somewhere.
We can make switching git branches simpler by integrating the checkout process with fzf. fzf is a command-line fuzzy finder which means we don't need to precisely remember the branch name. Just typing a few characters will list us the branches that match the existing branches using fuzzy logic.
You can add the following to your .bashrc or .zshrc file to configure a custom function git_checkout_branch to run fzf with the list of branches in the repo, which you can then search fuzzily.
# Slightly modified version of the script mentioned in https://revelry.co/insights/development/terminal-workflow-fzf/
git_checkout_branch() {
  if [[ $1 != "" ]]; then
    # pass all the parameters as-is, if provided
    git checkout $*
    return
  fi

  LINES=2
  # show branches
  result=$(git branch -a --color=always | grep -v '/HEAD\s' | sort |
    fzf --height 50% --border --ansi --tac --preview-window right:70% \
      --preview 'git log --oneline --graph --date=short --pretty="format:%C(auto)%cd %h%d %s" $(sed s/^..// <<< {} | cut -d" " -f1) | head -'$LINES |
    sed 's/^..//' | cut -d' ' -f1)

  if [[ $result != "" ]]; then
    if [[ $result == remotes/* ]]; then
      git checkout --track $(echo $result | sed 's#remotes/##')
    else
      git checkout "$result"
    fi
  fi
}
Source: Modified version of https://revelry.co/insights/development/terminal-workflow-fzf/
Then when you run the command git_checkout_branch in the terminal, you will be presented with the branches in the repo and can type part of the branch name to get the branch name you want. Pressing enter on the selected branch will switch the current branch to that branch.
You can, of course, add this as an alias instead of having to type the whole command.
alias gco='git_checkout_branch'
If you already know the branch name and don't want to be presented with a list of options, you can just use the command as gco <branch_name>, eg: gco develop.
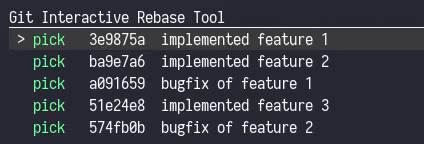
4. Using Git Interactive Rebase Tool
Although rebase and interactive rebase can seem like a scary concepts in the beginning, after you get used to it, they can be powerful tools to organize history in a Git repo. It can be useful in a variety of situations, including:
- Combining multiple commits into one
- Splitting a single commit into multiple commits
- Reordering commits
- Removing commits
- Fixing mistakes in commits
- Updating your local repository to match the upstream repository
You can learn more about rebasing in https://git-rebase.io/.
Git Interactive Rebase Tool can help make the process of interactive rebasing easier. It is a GUI tool that runs in the terminal and can be used to rebase commits in a git repo. It is written in Rust and is available for Linux, macOS and Windows.
You can view the documentation for more information on how to set up and use the tool, along with all its features.
Conclusion
Trying one or more of the above tips can help you become more productive with git. But as with any new workflow, it takes time to get used to it. So it might be good to start with one or two of the aforementioned tips and then move on to trying the others.
Bonus:
If you would prefer a more GUI approach to working with git but in the terminal, then you can try one of the followings: